Pages

Related Posts with Thumbnails

About Me

A collector and stroker of paper and other crafting gorgeousness! Happiest when surrounded by my crafting friends and buried wrist deep in stamps, paper, ink and bling.

Starting Points

Mojo Monday Blinkie

Awards

Total Visitors

Powered by Blogger.

Wednesday 22 December 2010

Last Minute Christmas Gifts


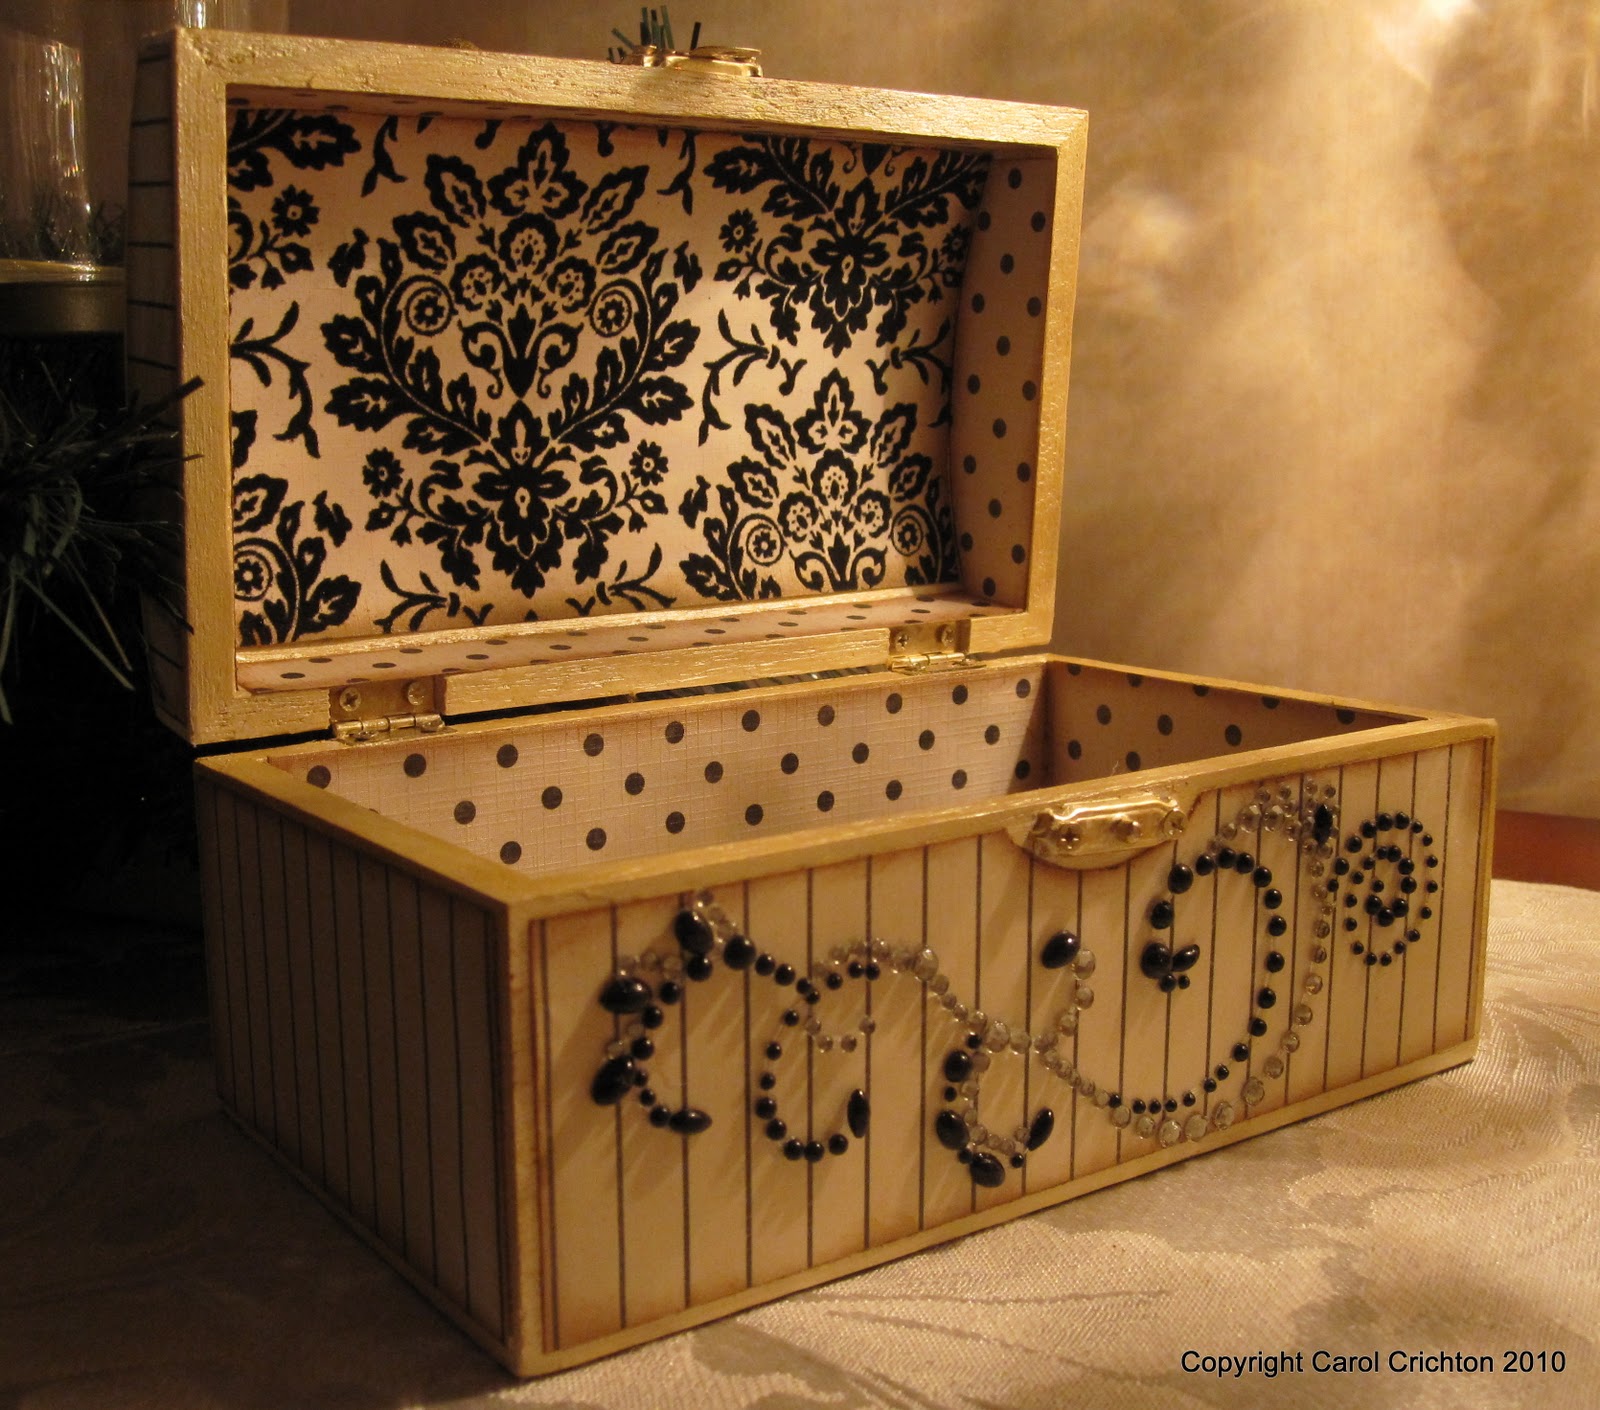
I came across three of these cute little bare wooden treasure chests a few weeks ago and decided to decorate for my sisters-in-law. After sanding I covered the box with Viva Inka Gold paint using a piece of wet and dry. This is the most gorgeous creamy textured paint and a little goes a very long way. It dries with a fabulous sheen.

I then covered the box with papers from the GCD Paris Nights paper stack. Oh my, these are lovely! Easy for me to cut them up because you get more than one of each , ha ha! The edges of each piece were inked with Tea Dye Distress Ink, to give them a slightly shabby look. The paper on the outside and inside of the lid are flocked, so strokeable!!

I covered the outside base of the box with a piece of black velvet paper to stop it from scratching surfaces. I always think that makes boxes look finished and more expensive looking.

Finally I dug out my Prima bling. Oh that took a deep breath to stick that on and give it away I can tell you! I just hope they like their little boxes.

Well, that's probably me done with blogging until after Christmas Day. So, I hope you are all where you want to be.

Keep warm, and Happy Christmas.

Iolanthe xx

Monday 20 December 2010

Look What The Postman Brought Me......


Isn't it amazing? This was my prize for coming 1st in the Bramwells Papercraft Challenge which I won with my 'Boys Toys' book.

So, what was in the box?
A gorgeous Bo Bunny bag, with all of the following Bo Bunny kits:
A Noel Canvas Project kit
Winter Joy Scrapbook kit
12x12 kit of Midnight Frost,
12x12 kit of Cambridge
12x12 kit of Olivia
Mini Edgy Album Sophie
Sophie paper pad
Mini Edgy Album Noel
Noel paper pad
Midnight Frost card kit
Noel card kit
Noel stamp set
Noel rub ons

Jones Tones glitters set
A cute little giraffe

Phew! Quite a list eh? Huge thanks to Bramwells for their very generous prize. All I need now is to get snowed in over Christmas so that I can play!!

I hope to be back posting regularly soon, life in the 'real world' has been getting in the way lately.

Stay warm! Happy crafting

Iolanthe x

Thursday 2 December 2010

It's Beginning To Look a Lot Like Christmas....


Looking out of the window at all that snow, there was only one stamp that I could use for my card today. It's now getting close to the point where I need to get on with the cards that will be made in batches. This one is for all my staff at work. So, I decided that I needed something classy and elegant that could be put together quickly. So here it is......


I stamped the image first using Adirondak Denim. The image was then die cut with the Marianne frame. Before taking it out of the frame I ran a Quickie glue pen over the embossed areas and then, after removing it from the frame, sprinkled it with Glamour Dust. I also added some Glamour Dust to the roof of the little cabin, the trees and the snow on the ground. The stamped panel was then mounted onto a piece of blue mirri card.

The background was embossed using a snowflake Cuttlebug folder and the edge inked with the Adirondak Denim ink.

So, there you have it, very simple and quick. All I have to do now is make another 25 to go with it!

Happy crafting

Iolanthe x


Tuesday 30 November 2010

I've Been Playing Tag

I haven't posted many cards lately, because I haven't made many.
I've been a little bit busy with this...........


I have entered this for the Bramwells Paper crafting Challenge. The paper was lovely to work with. It was full of foiled cogs and robots. I've called this book 'Boys Toys' and I'm going to fill it with pictures of all the 'boys' in my life and their various 'toys'. My brother, dad, and hubby always seem to have some kind of machine or electronic gadget to play with.


It is made from 5 A5 office envelopes bound with a punched border and then bound with my Bind it All and it has huge tags in each pocket. It was a challenge for me to make a book on a more masculine theme, but these papers were just great to work with. Many of them were really fun images and it was a shame to cover them up. That's the real challenge of being a confirmed Paperstroker  I often can hardly bring myself to cut these gorgeous papers up, let alone cover them when I do!!


There are lots of envelopes and pockets for tags and spaces for journalling. Here are e few more pictures showing the various pockets, tags, flaps and pull outs.


The papers are called Blips and Beeps. Other than the papers in the kit, all I used was Bazzil , a few Kaiser craft rub-ons, some HOTP journalling stamps and a few brads and page flips.

So, there you have it. It just occurred to me, that it fits in with the OCC challenge 'Tag you're it' since there are at least 20 tags in it!

Right, what next..........

Iolanthe x


Cool Blues


This card was a two minute make. All the elements were in the Bit Box. The stamped image was there and the white card with the foiled blue mirri card was in there too. I remember I cut the mirri card too short for a card I was making and chucked it into the bit box.

So the stamped image got its corners punched with a corner rounder and matted onto blue and then white card. The background card is hard to describe. Its from Kanban and is a pale icy blue with silver swirls and snowflakes on it.

A little satin blue ribbon and three blue cabochons and..voila! Not bad from bits and bobs. Just goes to prove why we crafters should never throw anything away!

Happy crafting.

Iolanthe x


Sunday 28 November 2010

'Bit Box' Cards


On my desk I have a box which is full of 'bits'. You know the sort of thing - tags, stamped images, die cuts; all sorts of bits that I've made to use on a  card, but then decided that something else works better, so they end up in the Bit Box.

Today I decided to trawl through it and see what I could use to make a card. This stamped and coloured Santa was in there, already die cut and layered onto his gold and cream scalloped circle.So I decided to turn it into a circular easel card for the OCC Tag You're It! Challenge. The little tag was in there too!

The top background paper is Dovecraft and the bottom layer is My Mind's Eye. Everything was inked with Vintage Photo distress ink.

Off to get warm! It's freeeezing !

Happy Crafting
Iolanthe x

Thursday 25 November 2010

O Christmas Tree


A quick card suitable for making in batches. The stamp. from Elusive Images, was stamped using Banner Brilliance ink onto a smooth white cardstock to give the graduated red-blue-green colour. This was then treated with Judikins Sticky stuff and heated until the surface looked slightly glossy. Glamour dust was then added to the whole area.

When cool, the stamped image was brushed to remove the excess Glamour Dust. It was then matted onto gold mirri card.

The centre background panel was embossed with the Cuttlebug Swiss Dots folder. A peel off sentiment and border strips complete the card.

Happy Crafting,

Iolanthe x

Wednesday 24 November 2010

O Holy Night


Today's card was made for Flourishes Timeless Tuesday Challenge.

It was very straightforward and quick. The background card is 7 x5. The background paper is Dovecraft. the edges of everything were inked with Vintage Photo Distress ink. The centre panel was cut with Nesties labels 17. The image (Whiff of Joy) was inked with archival black and coloured with copics. The edges were again inked through the stencil with Vintage Photo.

The stamped panel was placed on top of the red panel of Basic Grey Wassail after adding a strip of velvet paper, which had been punched with a Martha Stewart border punch.

The sentiment, from Inkadinkado, was stamped with encore gold ink and embossed with detail gold powder.

Three red cabochons finished it off.

Happy crafting

Iolanthe x

Saturday 20 November 2010

And Now For Something Completely Different.........


A couple of weeks ago I as lucky enough to be able to go on a Paper Artsy weekend. It was great and boy, did we pack a lot in. This was the project that we made on the Sunday and it took us all day. There was a lot of gessoing (is that a real word? well, if not it is now!) painting, stamping, die cutting, scoochying, ( we used a 'scoochy tool' to finish off the edges of the metal flowers).

We painted the canvas and stamped on it. We stamped, embossed metal and die cut the metal flowers and border strips.

Amazing what you can make a framed canvas, metal sheet, cardboard, string inks, and paint.

I might post some pictures of the other projects later along with some pictures from The Stamp Pad weekend, but I'll have to finish the projects first! There are just not enough hours in the day!

Happy crafting
Iolanthe x

Friday 19 November 2010

Come Let Us Adore Him


I really enjoyed making this card. It was one of those that came together really quickly. I bought the new Mariannie die yesterday and just had to use it. I stamped the King (Whiff of Joy) using versafine and coloured with copics. I used versamark pen to colour the crown, urn and part of the robe's collar and heat embossed using gold detail embossing powder.

I then cut the stamped image out using the inside lacy circle from the die set. I then cut  the outside ornate circle from the set and used the centre to mount up the focal image.

The sentiment was cut using a small circle nestie.

The hardest part was deciding where to place the gorgeous Prima poinsettia and leaves. Four gold nail heads in the corners finished it off.

Challenge : Flourishes Timeless Tuesday

Happy crafting
Iolanthe x

Thursday 18 November 2010

The Hardest Cards to Make


Together with cards for men, I still find it hard to come up with ideas when I have to make a sympathy card.
I always think that there is a balance to be struck between making an elegant card that shows that you care and have taken time and effort to make something special but without 'going over the top' and throwing everything that you've got at it.

I find that I often come back to this stamp for a sympathy card. I suppose I like its simple elegance. The floral flourish stamp and sympathy sentiment were stamped with Brilliance Peacock and heat embossed with clear glossy embossing powder.

The front panel was embossed using  the Creative Expressions Flourish folder. This is the first time I've used it but it is gorgeous, the embossing is really deep and crisp. The oval aperture was cut using the largest petite oval Nestability and the border punched using a Martha Stewart border punch..

A little ribbon and a few tiny gems were added for the finishing touches.

Happy Crafting

Iolanthe x


Tuesday 16 November 2010

A Fairy Happy Birthday


This is a card that I have made for a friend's Birthday. The starting point was a journaling card from the beautiful Prima Fairy Flora collection.

I cut an oval in the card using a large oval Nestie. Then I cut 2 Nestability labels 5. One was stamped with the sentiment from Clarity stamps with Forest Moss Distress Ink, and then lightly sponged with Bundled Sage. The other was cut diagonally in half and layered under opposite corners of the journalling card to add a little extra interest.

A couple of the gorgeous Prima Athena Flowers in Coral and some gems  for added bling, complete the card. I hope she likes it!

Happy crafting,
Iolanthe x

Sunday 14 November 2010

Sparkling Snowflakes


This card is one of those that is easy to replicate in bulk if you need a lot of the same card. You can get a bit of a production line going.

The large background snowflake stamp was inked up with Brilliance Orchid ink ans stamped across the DL card. It was then heat embossed with a clear sparkle embossing powder. I made a slit in the spine of the card  at the bottom of the stamped background and threaded the ribbon through, wrapped it around the card and tied in a simple knot.

The main focal image was given the same inking and embossing treatment before being matted onto a gorgeous pink mirri card. The outside mat was also inked with the orchid ink just to make it stand out from the background. All the mats were cut using the large labels Nestability.

Finally I added a greeting peel off as I didn't have a stamp that I thought was suitable.

Thanks for stopping by,

Happy Crafting,

Iolanthe x


Thursday 11 November 2010

Unto Us A Child Is Born


Keeping it simple today. This is for the Quixotic Paperie Challenge - anything but a square or rectangle.

The shape is cut and embossed from pearlised white card with Nestabilities curved rectangles. The wise men, from Inkadinkado, were stamped with versafine ink and sponged with the card still in the nestie with Faded Jeans Distress ink.

The sentiment was stamped with versafine onto  Nestability labels nine and again inked through with Faded Jeans.

Sentiment matted onto gold mirri card and some small gold beads added to finish it off.

Happy crafting,

Iolanthe x

Wednesday 10 November 2010

Amazing Workshop - Places available

Just a quick message to let anyone in the area know that there are a couple of spare places this Sunday at the Stamp Pad with the fantastic Kay Halliwell Sutton (Demonstrates for Paper Artsy, Blonde Moments and Crafty Notions, among others!). The workshop includes a fabulous lunch too. So, here are the details if you are interested.

"Misty Secret Garden" by Kay Halliwell Sutton.
   
Kay will be showing you how to make a shadow box. It is from Twiddleybitz Australia, is about 8" square with a 4cm deep box and she will be taking you through some interesting techniques to include, enamelling, stamping, and a new discovery with Misty web, which is a textile material. The workshop will start at 10am and run until approx. 4pm. This would make an absolutely gorgeous Christmas present for someone, so that's one less to worry about!

Call Gwen at the Stamp Pad  on : 01457 874646 to book or get more information.

Jolly Santa - Take Two


This is the second time I have featured this stamp on the blog, but I think he's just so jolly. Just how a real Santa should look.

In truth, I already had him stamped and coloured from a batch of cards I started to make a few weeks ago, and he was left over.

I have combined him with some of my favourite Christmas papers; Wassail from Basic Grey. I just love the warmth and richness of the colours. All the papers are inked with Walnut distress ink.

Challenges:

Flourishes Timeless Tuesday, use glitter on your card, and
Bring Back Beautiful 4 - the beauty of a bow

Happy Crafting

Iolanthe x

Sunday 7 November 2010

What a Fabulous Surprise


I have been away with work in the 'real' world and have returned to 'blogland' to find that I have been named as a 'True Beauty' winner in the Flourishes Bring Back Beautiful Challenge, "The Beauty of a Gift". You can see the original post here.

I am so delighted, to be honoured by such a prestigious team, it has truly made my day, no forget that, made my week!! Thank you to Julie and the team, I am, as we say here in Northern England, "Dead chuffed!"

Today's card is for the Mojo Monday sketch challenge and Bring Back Beautiful Challenge 4.


Here it is:


Pretty straightforward card. Marianne image stamped in versafine ink and coloured with Copics. I added a little applique that swells up when you heat it, to the snow. I love that stuff, always get excited when it starts to puff up. LOL.

I added a few gems as the string of ornaments that she is carrying.

Popped the whole thing onto a cuttlebugged background.

Happy crafting,

Iolanthe x


Friday 5 November 2010

Lovely Labels

Yes, here we are with Nestabilities labels 10 - again! I love this die, I think it makes such a pretty card shape.


This time I have cut an oval aperture at the same time as cutting the outside shape. Leaving the card in the dies I have inked with Tattered Rose distress ink. This frame has then been popped on foam pads on top of the apricot background.

The sentiment is stamped onto an oval, which again has been inked before removing the die. I love the look of having the crisp white border all the way around. Then mounted onto a scalloped oval, so that just the edges peep out.

The lovely flourishes were cut using a Marianne die. Add one lovely tattered looking Prima rose and a few pearls to finish it off.

Happy crafting

Iolanthe x

Tuesday 2 November 2010

We Three Kings


 Keeping it simple again, folks. Sometimes you just don't have time to spend hours on a card, especially if you have to churn out a number of them.

The base card is a lovely soft cream with a gold sheen on it, so it didn't need too much to make it look really expensive. I decided to simply stamp the beautiful collage image with black versafine.

Once mounted on gold card, this was placed slightly off set onto the snowflake cuttlebugged panel.

The poinsettias and leaves, from Prima, are layered up and fastened together with a gold brad.

Happy crafting,

Iolanthe

Sunday 31 October 2010

Corner Punches on a Circle


I love this technique as the end result always looks so pretty and elegant. One day soon, I'm going to use it on a Christmas card with dark colours, I think that would look scrumptious!  but for now I've used it for a very 'girly' card.

I started by cutting a circle and marking it into 8 pieces on the back, as if you were cutting a pie into 8 equal portions. Then I lined up my 'corner adorner' punch centrally along each line and punched. I continued around the circle punching on each of the eight lines. Hey Presto! A circle with a pretty cut out in it.

This was mounted on foam pads on top of a scalloped circle.

The motif in the centre is a textured rub on, but any stamped image, sentiment or embellishment that fits in the space would work.

The lacy mat is formed by using Martha Stewart Round the Page punches. The papers are from K&Co.

Of course, I couldn't resist popping on some tiny gems just to add a little sparkle. Yes, definitely got to give this a go on a Christmas theme.

Happy Crafting

Iolanthe x

Friday 29 October 2010

Now For Something Completely Different.....

In my 'real life' I have a few people who have more than a passing interest in anything related to buses or trains. So when it comes to their Birthday cards it can sometimes be a challenge to come up with something a little bit different.


I created the background by masking off thin lines, to separate the various areas and created a frame around the edge of the card.

Once the areas are defined, I stamped part of a transport related stamp with versamark into each area, making sure that any of the surrounding areas had been covered. I then used a selection of chalks to colour over the stamped images. I love this technique, it always gives me a thrill to see the stamped images come back through the chalk.

The main focal bus image was simply stamped with black versafine and the edges softened with chalk and four little gold brads used on the corners just finished it off.

Thanks for stopping by.

Happy crafting

Iolanthe x

Thursday 28 October 2010

Two For The Price of One


This card is for the Mojo Monday Sketch Challenge round or square:


All of the papers are from Basic Grey Indian Summer Collection and the gems are Basic Grey Bling it On.

This is the first time I have entered either of these challenges, so to be able to crack both with one card was very fortuitous. Challenges like this certainly get the creative juices flowing.

Thanks for visiting.

Happy Crafting,
Iolanthe x

Wednesday 27 October 2010

Simply Thinking of You

Flourishes Timeless Tuesday Challenge: The challenge was 'Anything goes, but buttons and bows'.

Today's offering is very simple and quite quick to do. I always think that, as a cardmaker, there are sometimes occasions when we have to hold back and not throw everything we have at a card. 'Thinking of You' is one of those phrases that covers a multitude of situations, where any other sentiment is simply not appropriate.


The sentiment is stamped with Encore Gold and embossed with detail gold embossing powder. The panel was then cut and embossed. Each of the panels was mounted on matt gold card to try and keep an elegant feel to the card.


I love the texture and pattern of the cuttlebugged panel. I didn't think this card needed anything else. Sometimes you have to know when to stop! LOL.

Happy crafting,

Iolanthe x