Pages

Related Posts with Thumbnails

About Me

A collector and stroker of paper and other crafting gorgeousness! Happiest when surrounded by my crafting friends and buried wrist deep in stamps, paper, ink and bling.

Starting Points

Mojo Monday Blinkie

Awards

Total Visitors

Powered by Blogger.

Saturday, 12 November 2011

Curtain Call box


The last of the retreat projects to share designed by Gwen Fletcher at The Stamp Pad.

A beautiful box covered and decorated with the fantastic Graphic 45 Curtain Call Collection. Lots of cutting and inking. I chose to ink with Walnut Distress but some used Black Soot Distress, which looked great too.

So, that was our fantastic retreat. We are so lucky to have our lovely Gwen and her team - Carol, Julie and Jenny, who looked after us all.

We can't wait for the next one in March. Why don't you join our happy band? More details here or ring The Stamp Pad for more info.

Back soon with more to share. Thanks for stopping by.

Iolanthe

Friday, 11 November 2011

Ornate Frame


Another fab project designed by Gwen Fletcher from The Stamp Pad. We learned another fantastic technique using paint, distress stains, crackle glaze and metallic mica sprays to colour the frame.

Lots of die cutting, embossing and inking on all the basic elements to create the finished display.

One of the most amazing things about this class was mingling with each other and sharing the stories behind the photos we had chosen. There were even some tears as old faded photos of loved ones brought back moving memories. It really brought home to me how precious even the most scratched and tatty old picture can be and made me more determined to scrap them in future. Mine is a picture of my wonderful Mum and the finished piece is now hanging on the wall in my craft room.


A close up of some of the many elements that we made. We also used some Prima Madeline paper, not that you would ever know after we had wet it, scrunched it, inked it and ironed it! Wow, that paper took some abuse! (By the way, we did stroke it first!) I just love the rust effect on the lock and clock - lots of ink and distress embossing.

Thank you Gwen for not only a fabulous class, but for the chance to share some lovely moving stories with each other.

Stop by for another project tomorrow.

Iolanthe x

Thursday, 10 November 2011

Stamp Pad Retreat


Hi Blog buddies.

It has been a long time, I know but I'm back again with some projects to share.

Last weekend I was lucky to spend the weekend with my best friends playing. Oh, did we have fun. Fab friends, fab food and amazing crafting projects. What more could a girl want?

All the projects were designed by our amazing friend Gwen Fletcher from the Stamp Pad.

We mad this fabulous box. What a treasure. Graphic 45 Christmas Emporium papers, an aged brass effect door plate and handle and tons of walnut distress ink.

But, anyone who knows Gwen will know that she didn't stop there, oh no, inside the bad we had a book......


We learned a fabulous traditional book making technique, stitching the pages of the book together. definitely one that, as a bit of a book making fan, I will be trying again.

The book was full of tags, pockets and flaps and embellished with brads, ribbons, buttons and bows.

It is truly a keeper, one that will be treasured for many years. I know some of the ladies were planning to give theirs as a gift, well whoever gets them will really treasure them I'm sure.

Back tomorrow with another retreat project to share.

Happy crafting.

Iolanthe x

Saturday, 1 October 2011

A Sozzled Warren!


Oh I just love this image, it really made me laugh. The idea of a drunken rabbit, love it!

The image and papers are from the September release from Craftwork Cards. A whole cacophony of Warren and his friends making Christmas merriment. These are really great when you have many cards to make.


Here he is again with his reindeer pal.

This was easy, fold back one edge of the card and add 2 strips of co-ordinating paper to the right hand side. The image was already die cut so just needed a sprinkling of Glamour Dust around the edges and over the ribbons on the parcels.

The image was then mounted on foam pads on top of the doilies cut with the latest Marianne die. Isn't that die just scrumptious. I think that is going to be one of my favourites.

Squidge some green Stickles over the candy dots and pop into the corners and job done.

Off to make some more.

Thanks for stopping by.

Iolanthe x

Thursday, 29 September 2011

Happy Birthday


Another Nestie and Just Rite card for you today. This time a 6 x 6 easel card using Labels 13 and the Victorian Oval Frames stamp set.

The frame was stamped with Chipped Sapphire Distress Ink and embossed with clear embossing powder. The frame was then cut with labels 13. The sentiment which is a Clarity stamp was given the same treatment.

The background paper is from the Blue Awning Collection by K & Co and I still love it. 


I coloured the centre of a plain Prima flower to match the beige tones in the paper and added some small pearls to the corners. The leaves are cut with a Mariann die.

Tomorrow I'm getting glittered up to start Christmas. I guess I'll be wearing Glamour Dust for the rest of the year!

Back tomorrow.

Iolanthe x 

Wednesday, 28 September 2011

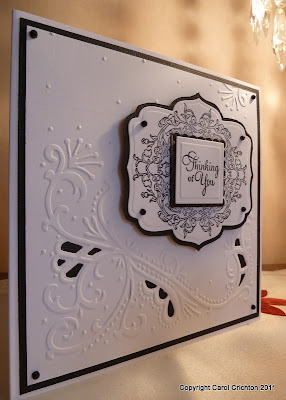
Thinking Of You


Another card focusing on the Just Rite stamps that co-ordinate with Nestability labels. This stamp set is called Vintage Floral Labels on the packaging it says that it is designed to be used with labels 13 However, I decided to team it up with labels 5 and I think it proves how versatile they are.


The stamped label and sentiment, which is from the same stamp set, were both stamped with black Versafine ink.

The background was created using white stamping card this was embossed and cut using Marianne Designables Swirls.

Mating the embossed panel onto black card emphasises the cut work pattern. Four small black gems in the corners add the finishing touch. I think black and white is just timeless don't you?

Another Just Rite/Nestie card from me tomorrow.

Happy crating.

Iolanthe x


Tuesday, 27 September 2011

The Kindness You Share Is A Blessing


A simple card to share today. The basic card is 5 x 7.

Showcasing the fabulous Just Rite stamps which match Nestability Labels 20. The label is stamped with Victorian Velvet Distress Ink and embossed with clear embossing powder. I always stamp first and then cut with the die. I find that taping the die down with two pieces of low tack tape keep it from moving.

The central sentiment was stamped using Espresso Adirondack ink.

The background paper is DCWV put through an embossing folder and the white core exposed by simply gently sanding it back. It feels like flocked paper, but be careful, it is very easy to sand too far and get holes! Not a good look!

The whole thing is then matted onto brown glitter paper with a piece of brown satin ribbon and 4 small brown brads.

Easy peasy.

Happy crafting.

Iolanthe x


Wednesday, 21 September 2011

Happy Birthday Dad


This is the card that I made for my dear Daddy for his birthday.

Very simple and straightforward.

The easel card base is 6 x 6. Backing papers are from Memory box. The stamp is one I bought ages ago and I have no idea who made it, but Dad loves fishing so I used it for the first time. It is coloured with Copics and the panel cut with the fabby Labels 22. I think this is going to become my new favourite.

The sentiment stamp is from a set by Lili of the Valley.

Really simple, but fun to make. I hope he likes it.

Happy crafting.

Iolanthe x

PS After many requests I have now added an 'email me' button (just above Popular Posts on the right hand side) as several people didn't have a Blogger Id to register comments. 

Monday, 19 September 2011

So, What Was In The Box?

Some people have asked me to post some pictures of the book that was in the box.

So here you go..........


My dear friend Gwen is such a lovely and talented lady that I really wanted to make her something special and since I have an addiction to mini books that was the only thing to do.

Hope you liked peeking into the box it was such fun to make.

Happy crafting,

Iolanthe x


Saturday, 6 August 2011

Think Before You Throw That Box Away!


Well, I have been a long time missing again, but I have been very busy. First of all I have moved my crafting space from the loft into a spare bedroom that hubby had been using as his 'music room'. My ongoing medical drama was making it almost impossible to do any crafting but now, that I have my new space, I have no excuses!

So my first project was this book in a box for my dear friend Gwen's special Birthday.

The box began life as a Thornton's Premium Chocolate box. I got the chocolates at Christmas from hubby, who said he had bought them for me especially for the box as he knew I would do something with it. They are so sturdy.


The box was first lightly sanded before priming with a thin coat of gesso. I then painted it with Green Patina paint by Eco Green. It has a lovely lustre to it. I then used Pink Paislee Butterfly Garden papers to decorate both the inside and outside of the box. All the edges of the paper were inked with Vintage Photo Distress Ink. I rubbed a little gold rub and buff onto the edges of the box to age it a little.

I finished off the sides of the box with a length of sage green velvet ric-rac ribbon which worked perfectly!


The gorgeous red satin ribbon was part of the box so I used some burgundy roses and amber skeleton leaves to pull it all together. I added a Tim Holtz bookplate to highlight the little angel on the bottom of the die cut panel.


Some Prima flowers and leaves, together with some gold and pearl sprigs completed the arrangement. So, that's the box. I have to say I was really pleased with it when it was finished. I will never look at an empty chocolate boxing quite the same way.

{PS I got another box for my Birthday 2 weeks ago....and one for our Anniversary yesterday!}

Thanks for stopping by,

Iolanthe x

Tuesday, 19 July 2011

Quick, Fresh And Girly!


I was commissioned to make this little mini by a teacher for a little girl in her class who was leaving. Since I didn't know her name or age, I tried to leave it as generic as possible and decided to go for fresh and girly, as I thought that would cover all bases.


It also had to be quick and easy for me to do as I only had a short time to do it. The book is 6x6 and all the papers and chippies are from a kit by Kelly Pannacci which I have had for years. It was nice to use up some of my older stash.


The whole thing is really very straightforward with places for fairly standard sized photos.


I included lots of pockets with tags so that all her classmates could write little messages to her.


I did a little bit of inking but really wanted to keep it quite clean and fresh.


So there you have it. I'm told the teacher loved it, so I hope the little girl did too.

Happy crafting,

 Iolanthe x


Thursday, 14 July 2011

Once Upon A Springtime - Part 2

 
Hi there blog friends. Here are the rest of the pictures of my 'Once Upon a Springtime' book.


The left hand page is simply a triangular pocket with tags. The huge tag was cut on the Cricut and has been stencilled with Versaark Ink and brushed with Perfect Pearls to give a lovely soft shimmery effect. 
 
 
The right hand page has been layered with elements hand cut from the designer paper and a bower cut using the Cricut. All parts which overlap the photo mat have been left unglued so that a photo can be slipped in underneath.


There is quite a lot going on on this left hand page. I think I got a little carried away! The flower on the ribbon is held in place with a hidden magnet. The 'cover' has been embossed with a cuttlebug folder and then inked with Distress ink. The butterfly was misted with Tattered Angels glimmer mists and then suspended by a nylon thread.


Behind the 'cover' is an acetate pocket which holds the Tattered Angels tag which has again been sprayed over a Crafters Workshop template. The photo doesn't pick up the shimmer but in real life the tag is luscious.
 
 
On the right hand page the arbour has been cut with the Cricut and frames the fairy. This page is held closed with a photo flip.


Here on the left I have used another Tattered Angels tag to form a pocket, which after inking, has been embellished with a lovely chipboard bird from the Basic Grey Porcelain Collection, which I think worked really well.


Again both pages have the huge Cricut tag, I just love them. There's tons of space on the back and front for photos or journaling. Martha Stewart borders were punched, little tags stencilled and some Prima flowers thrown in for good measure - Oh, and I couldn't resist the K&Co acetate butterfly! Just gorgeous!
 
 
And finally - The corner has a huge Fancy Pants rub on which I have had for ever. The picket fence and flowers were cut on the Cricut and the little birdie wearing the sun hat was cut from the paper. I think it looks ever so cute and just finishes it off. 


On the inside of the back cover another Tattered Angels tag has been inked and embellished with one  of the fairies cut from the paper and her wings have been glittered. Just in case there isn't enough room for pictures, a little fold out mini book is tucked into the pocket.
 
 
The spine is made from Grungepaper which has been 'Cuttlebugged' and inked liberally. I really love the way the grungepaper takes on the ink. By the time you've finished inking it it feels like suede.
 
So, there you have it. Off now to find something new to do.

 
Iolanthe x