


Hello Blog friends. I seem to have had weeks where life has conspired against me to stop me from blogging. I won't bore you with my catalogue of health setbacks, they would be enough for a whole series of scripts for a medical drama series! Suffice it to say that the latest one denies me access to my crafting space in the loft.
However, I promised some piccies of my latest project and here they are. So far everything I have made this year has been given away, so I decided that this one is for me. I intend to fill it (eventually) with pictures of my family in my garden.

The papers are from the Once Upon a Springtime stack from Graphic 45.
I tried to challenge myself to use as many different techniques and materials as I could and it is stuffed with both. I also used my Cricut and Slice, which was one of my crafting New Year's resolutions.
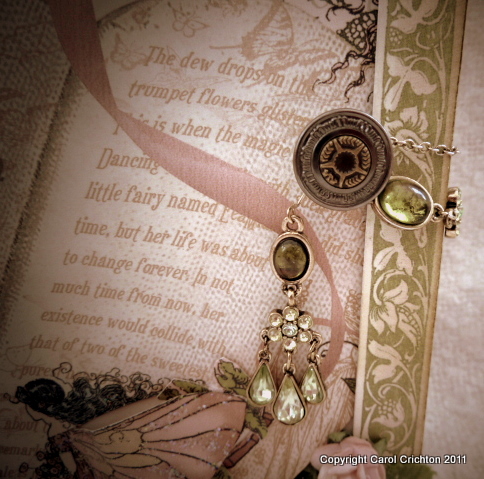
The book is 8x8 and I have constructed it from scratch using cream cardstock. I just love the closure. It is made from a an old necklace and a pair of dangly earrings which are wound around a 7Gypsies Book Knob to hold the chunky book closed. The colours are just fabulous.

First double page. Very straightforward. Pocket with tags, lots of inking with Tattered Rose Distress ink. Prima flowers inked and Martha Stewart border punch used to trim the pocket. I used the same MS punch throughout the book. Opposite page, tons of Prima flowers and bling. The little booklet tucked into the acetate corner has a cute little poem called 'A fairy went a marketing'.

To the left, 2 large pockets one with a HUGE tag cut on my Cricut. I just LOVE this tag. Again it makes an appearance several times throughout the book, each time treated with a different technique. This one was stencilled with a Crafters Workshop template. (Another 'must use that' ticked off my list!)6
The page on the right has flourish rub ons in opposite corners. The little book opens out for more photo space and is secured with a secret magnet underneath the paper.

This is my favourite double page. There are a few hidden features. I just loved the way it all came together. The fairy picture on the left is a pocket which has 2 large tags in it.

The fairy on the right of the pocket is framed with an oval chipboard frame from BG Porcelain. It was nice to be able to use some more of that too as I had loads left.. Hanging from the frame is a little silver bee charm, hanging from some fine nylon thread.

Behind the pocket page there is even more space for pictures. The lovely vine leaf was cut using a Spellbinders border. I cut the cute little bunnies using my Slice.

On the right hand page, the fairy picture is held in place with the vintage lace, again more room for photos. The page drops down to reveal more photo space and a transparent overlay, behind which I can tuck another photo.

The acetate panel drops down to reveal even more piccy space.

So, that's it for Part 1. I'm starting to worry about how thick the book will be when (if ever!!) I get around to putting pictures in it!.
Thanks for stopping by.
Iolanthe x


No comments:
Post a Comment