Pages

Related Posts with Thumbnails

About Me

A collector and stroker of paper and other crafting gorgeousness! Happiest when surrounded by my crafting friends and buried wrist deep in stamps, paper, ink and bling.

Starting Points

Mojo Monday Blinkie

Awards

Total Visitors

Powered by Blogger.

Saturday, 6 August 2011

Think Before You Throw That Box Away!


Well, I have been a long time missing again, but I have been very busy. First of all I have moved my crafting space from the loft into a spare bedroom that hubby had been using as his 'music room'. My ongoing medical drama was making it almost impossible to do any crafting but now, that I have my new space, I have no excuses!

So my first project was this book in a box for my dear friend Gwen's special Birthday.

The box began life as a Thornton's Premium Chocolate box. I got the chocolates at Christmas from hubby, who said he had bought them for me especially for the box as he knew I would do something with it. They are so sturdy.


The box was first lightly sanded before priming with a thin coat of gesso. I then painted it with Green Patina paint by Eco Green. It has a lovely lustre to it. I then used Pink Paislee Butterfly Garden papers to decorate both the inside and outside of the box. All the edges of the paper were inked with Vintage Photo Distress Ink. I rubbed a little gold rub and buff onto the edges of the box to age it a little.

I finished off the sides of the box with a length of sage green velvet ric-rac ribbon which worked perfectly!


The gorgeous red satin ribbon was part of the box so I used some burgundy roses and amber skeleton leaves to pull it all together. I added a Tim Holtz bookplate to highlight the little angel on the bottom of the die cut panel.


Some Prima flowers and leaves, together with some gold and pearl sprigs completed the arrangement. So, that's the box. I have to say I was really pleased with it when it was finished. I will never look at an empty chocolate boxing quite the same way.

{PS I got another box for my Birthday 2 weeks ago....and one for our Anniversary yesterday!}

Thanks for stopping by,

Iolanthe x

Tuesday, 19 July 2011

Quick, Fresh And Girly!


I was commissioned to make this little mini by a teacher for a little girl in her class who was leaving. Since I didn't know her name or age, I tried to leave it as generic as possible and decided to go for fresh and girly, as I thought that would cover all bases.


It also had to be quick and easy for me to do as I only had a short time to do it. The book is 6x6 and all the papers and chippies are from a kit by Kelly Pannacci which I have had for years. It was nice to use up some of my older stash.


The whole thing is really very straightforward with places for fairly standard sized photos.


I included lots of pockets with tags so that all her classmates could write little messages to her.


I did a little bit of inking but really wanted to keep it quite clean and fresh.


So there you have it. I'm told the teacher loved it, so I hope the little girl did too.

Happy crafting,

 Iolanthe x


Thursday, 14 July 2011

Once Upon A Springtime - Part 2

 
Hi there blog friends. Here are the rest of the pictures of my 'Once Upon a Springtime' book.


The left hand page is simply a triangular pocket with tags. The huge tag was cut on the Cricut and has been stencilled with Versaark Ink and brushed with Perfect Pearls to give a lovely soft shimmery effect. 
 
 
The right hand page has been layered with elements hand cut from the designer paper and a bower cut using the Cricut. All parts which overlap the photo mat have been left unglued so that a photo can be slipped in underneath.


There is quite a lot going on on this left hand page. I think I got a little carried away! The flower on the ribbon is held in place with a hidden magnet. The 'cover' has been embossed with a cuttlebug folder and then inked with Distress ink. The butterfly was misted with Tattered Angels glimmer mists and then suspended by a nylon thread.


Behind the 'cover' is an acetate pocket which holds the Tattered Angels tag which has again been sprayed over a Crafters Workshop template. The photo doesn't pick up the shimmer but in real life the tag is luscious.
 
 
On the right hand page the arbour has been cut with the Cricut and frames the fairy. This page is held closed with a photo flip.


Here on the left I have used another Tattered Angels tag to form a pocket, which after inking, has been embellished with a lovely chipboard bird from the Basic Grey Porcelain Collection, which I think worked really well.


Again both pages have the huge Cricut tag, I just love them. There's tons of space on the back and front for photos or journaling. Martha Stewart borders were punched, little tags stencilled and some Prima flowers thrown in for good measure - Oh, and I couldn't resist the K&Co acetate butterfly! Just gorgeous!
 
 
And finally - The corner has a huge Fancy Pants rub on which I have had for ever. The picket fence and flowers were cut on the Cricut and the little birdie wearing the sun hat was cut from the paper. I think it looks ever so cute and just finishes it off. 


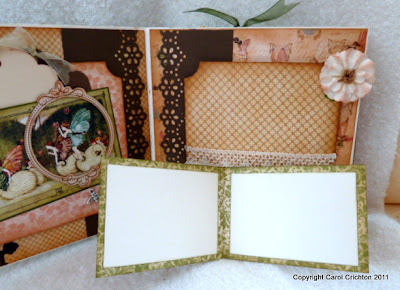
On the inside of the back cover another Tattered Angels tag has been inked and embellished with one  of the fairies cut from the paper and her wings have been glittered. Just in case there isn't enough room for pictures, a little fold out mini book is tucked into the pocket.
 
 
The spine is made from Grungepaper which has been 'Cuttlebugged' and inked liberally. I really love the way the grungepaper takes on the ink. By the time you've finished inking it it feels like suede.
 
So, there you have it. Off now to find something new to do.

 
Iolanthe x

Tuesday, 5 July 2011

Once Upon A Springtime - Part 1


Hello Blog friends. I seem to have had weeks where life has conspired against me to stop me from blogging. I won't bore you with my catalogue of health setbacks, they would be enough for a whole series of scripts for a medical drama series! Suffice it to say that the latest one denies me access to my crafting space in the loft.

However, I promised some piccies of my latest project and here they are. So far everything I have made this year has been given away, so I decided that this one is for me. I intend to fill it (eventually) with pictures of my family in my garden.


The papers are from the Once Upon a Springtime stack from Graphic 45.

I tried to challenge myself to use as many different techniques and materials as I could and it is stuffed with both. I also used my Cricut and Slice, which was one of my crafting New Year's resolutions.


The book is 8x8 and I have constructed it from scratch using cream cardstock. I just love the closure. It is made from a an old necklace and a pair of dangly earrings which are wound around a 7Gypsies Book Knob to hold the chunky book closed. The colours are just fabulous.


First double page. Very straightforward. Pocket with tags, lots of inking with Tattered Rose Distress ink. Prima flowers inked and Martha Stewart border punch used to trim the pocket. I used the same MS punch throughout the book. Opposite page, tons of Prima flowers and bling. The little booklet tucked into the acetate corner has a cute little poem called  'A fairy went a marketing'.


To the left, 2 large pockets one with a HUGE tag cut on my Cricut. I just LOVE this tag. Again it makes an appearance several times throughout the book, each time treated with a different technique. This one was stencilled with a Crafters Workshop template. (Another 'must use that' ticked off my list!)6

The page on the right has flourish rub ons in opposite corners. The little book opens out for more photo space and is secured with a secret magnet underneath the paper.


This is my favourite double page. There are a few hidden features. I just loved the way it all came together. The fairy picture on the left is a pocket which has 2 large tags in it.


The fairy on the right of the pocket is framed with an oval chipboard frame from BG Porcelain. It was nice to be able to use some more of that too as I had loads left.. Hanging from the frame is a little silver bee charm, hanging from some fine nylon thread.


Behind the pocket page there is even more space for pictures. The lovely vine leaf was cut using a Spellbinders border. I cut the cute little bunnies using my Slice.


On the right hand page, the fairy picture is held in place with the vintage lace, again more room for photos. The page drops down to reveal more photo space and a transparent overlay, behind which I can tuck another photo.


The acetate panel drops down to reveal even more piccy space.


So, that's it for Part 1. I'm starting to worry about how thick the book will be when (if ever!!) I get around to putting pictures in it!.

Thanks for stopping by.

Iolanthe x 


Saturday, 18 June 2011

Happy 80th Birthday


One of Hubby's uncles recently celebrated his 80th Birthday. So, a special card was required but had to be made with minimum effort and time!

The base card is 8 x 8, much larger than anything I normally make, but since I had bought a pack of ten some time ago, I thought it high time I tried to use them. You know what, I was really pleased with the way it turned out, and the large area made the most of this gorgeous K&Co vellum from the beautiful Flora and Fauna Speciality Paper Stack.
 

The aperture is cut using Nesties labels 21. The sentiment was printed on my computer and matted onto dark green card before layering it onto a pale green marbled paper. 4 green pearl brads finished it off and secured the vellum to the card.

I've been working on another book using the fabby Once Upon  A Springtime from Graphic 45 and it is nearly finished, so I'll post some piccies over the next few days. In the meantime I have 2 Father's Day cards to make, so I had better get on with it!

Happy crafting

Iolanthe x


Sunday, 22 May 2011

Happy Birthday Mum


Hi there my blog friends. Today's card is one I made for my Mum's Birthday. She loves roses so I dug out my lovely Prima paper and Prima roses and came up with this.

The edges of the paper and the white Prima rose are inked with Victorian Velvet Distress Ink. I cut the centre from the card and the patterned paper with my Nesties labels 16 and sandwiched the acetate in between.

The focal image is a textured rub on, easy eh? A little stickles around the edge of the window for a bit of sparkle.


I added some very pale pink mottled paper on the insert so that it can be seen through the acetate window. It has just enough colour to give a nice contrast against the white centre panel.

So, there you have it. Easy! I'm entering this for this week's Our Creative Corner Challenge - Frame It!.

Thanks for stopping by.

Happy crafting,

Iolanthe x

Sunday, 8 May 2011

Another Bo Bunny Birthday Book

Hi blog friends. Long time no see!

My recent illness has meant that I have had neither the energy nor the inclination to craft - I must have been sick! I have been able to play a little.

The first project was to make a book for my lovely friend Gill's 40th Birthday. I chose to use the Bo Bunny Olivia Collection.

When I first saw this collection I wasn't sure about it, but when I started to put it together I changed my mind. Some interesting colour combos and girly without being pink.


The tag on the left hand page is in an acetate pocket so that the lovely flower detail on the tag can still be seen.


The flowers on the left hand page are mounted onto acetate so they appear to float over the photo mat behind.


This was a fun project to play with. Looking forward to seeing it again when it has pictures in it.
Thanks for stopping by. I hope to be around a little more regularly, health issues permitting!
Happy crafting.
Iolanthe x