Pages

Related Posts with Thumbnails

About Me

A collector and stroker of paper and other crafting gorgeousness! Happiest when surrounded by my crafting friends and buried wrist deep in stamps, paper, ink and bling.

Starting Points

Mojo Monday Blinkie

Awards

Total Visitors

Powered by Blogger.

Tuesday, 5 July 2011

Once Upon A Springtime - Part 1


Hello Blog friends. I seem to have had weeks where life has conspired against me to stop me from blogging. I won't bore you with my catalogue of health setbacks, they would be enough for a whole series of scripts for a medical drama series! Suffice it to say that the latest one denies me access to my crafting space in the loft.

However, I promised some piccies of my latest project and here they are. So far everything I have made this year has been given away, so I decided that this one is for me. I intend to fill it (eventually) with pictures of my family in my garden.


The papers are from the Once Upon a Springtime stack from Graphic 45.

I tried to challenge myself to use as many different techniques and materials as I could and it is stuffed with both. I also used my Cricut and Slice, which was one of my crafting New Year's resolutions.
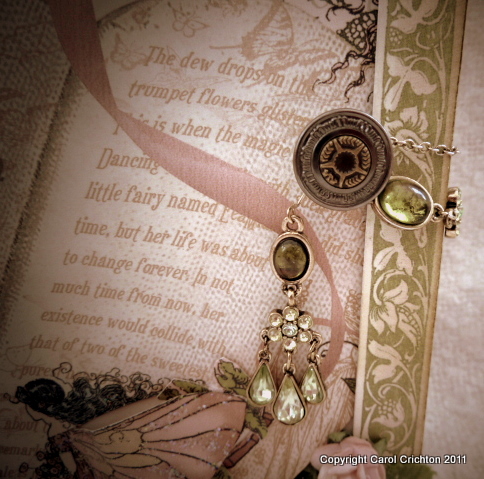

The book is 8x8 and I have constructed it from scratch using cream cardstock. I just love the closure. It is made from a an old necklace and a pair of dangly earrings which are wound around a 7Gypsies Book Knob to hold the chunky book closed. The colours are just fabulous.


First double page. Very straightforward. Pocket with tags, lots of inking with Tattered Rose Distress ink. Prima flowers inked and Martha Stewart border punch used to trim the pocket. I used the same MS punch throughout the book. Opposite page, tons of Prima flowers and bling. The little booklet tucked into the acetate corner has a cute little poem called  'A fairy went a marketing'.


To the left, 2 large pockets one with a HUGE tag cut on my Cricut. I just LOVE this tag. Again it makes an appearance several times throughout the book, each time treated with a different technique. This one was stencilled with a Crafters Workshop template. (Another 'must use that' ticked off my list!)6

The page on the right has flourish rub ons in opposite corners. The little book opens out for more photo space and is secured with a secret magnet underneath the paper.


This is my favourite double page. There are a few hidden features. I just loved the way it all came together. The fairy picture on the left is a pocket which has 2 large tags in it.


The fairy on the right of the pocket is framed with an oval chipboard frame from BG Porcelain. It was nice to be able to use some more of that too as I had loads left.. Hanging from the frame is a little silver bee charm, hanging from some fine nylon thread.


Behind the pocket page there is even more space for pictures. The lovely vine leaf was cut using a Spellbinders border. I cut the cute little bunnies using my Slice.


On the right hand page, the fairy picture is held in place with the vintage lace, again more room for photos. The page drops down to reveal more photo space and a transparent overlay, behind which I can tuck another photo.


The acetate panel drops down to reveal even more piccy space.


So, that's it for Part 1. I'm starting to worry about how thick the book will be when (if ever!!) I get around to putting pictures in it!.

Thanks for stopping by.

Iolanthe x 


Saturday, 18 June 2011

Happy 80th Birthday


One of Hubby's uncles recently celebrated his 80th Birthday. So, a special card was required but had to be made with minimum effort and time!

The base card is 8 x 8, much larger than anything I normally make, but since I had bought a pack of ten some time ago, I thought it high time I tried to use them. You know what, I was really pleased with the way it turned out, and the large area made the most of this gorgeous K&Co vellum from the beautiful Flora and Fauna Speciality Paper Stack.
 

The aperture is cut using Nesties labels 21. The sentiment was printed on my computer and matted onto dark green card before layering it onto a pale green marbled paper. 4 green pearl brads finished it off and secured the vellum to the card.

I've been working on another book using the fabby Once Upon  A Springtime from Graphic 45 and it is nearly finished, so I'll post some piccies over the next few days. In the meantime I have 2 Father's Day cards to make, so I had better get on with it!

Happy crafting

Iolanthe x


Sunday, 22 May 2011

Happy Birthday Mum


Hi there my blog friends. Today's card is one I made for my Mum's Birthday. She loves roses so I dug out my lovely Prima paper and Prima roses and came up with this.

The edges of the paper and the white Prima rose are inked with Victorian Velvet Distress Ink. I cut the centre from the card and the patterned paper with my Nesties labels 16 and sandwiched the acetate in between.

The focal image is a textured rub on, easy eh? A little stickles around the edge of the window for a bit of sparkle.


I added some very pale pink mottled paper on the insert so that it can be seen through the acetate window. It has just enough colour to give a nice contrast against the white centre panel.

So, there you have it. Easy! I'm entering this for this week's Our Creative Corner Challenge - Frame It!.

Thanks for stopping by.

Happy crafting,

Iolanthe x

Sunday, 8 May 2011

Another Bo Bunny Birthday Book

Hi blog friends. Long time no see!

My recent illness has meant that I have had neither the energy nor the inclination to craft - I must have been sick! I have been able to play a little.

The first project was to make a book for my lovely friend Gill's 40th Birthday. I chose to use the Bo Bunny Olivia Collection.

When I first saw this collection I wasn't sure about it, but when I started to put it together I changed my mind. Some interesting colour combos and girly without being pink.


The tag on the left hand page is in an acetate pocket so that the lovely flower detail on the tag can still be seen.


The flowers on the left hand page are mounted onto acetate so they appear to float over the photo mat behind.


This was a fun project to play with. Looking forward to seeing it again when it has pictures in it.
Thanks for stopping by. I hope to be around a little more regularly, health issues permitting!
Happy crafting.
Iolanthe x


Saturday, 12 March 2011

Talented Trio Award


Wow! How chuffed am I, The ladies at Our Creative Corner have picked me as one of their Talented Trio for last week's Distressed to De-stress challenge. I am so honoured. Thank you so much.

I'm currently working on lots of things that I can't post at the moment, but I will be able to share them after next weekend.

Hope to be back with some more cards soon.

Happy Crafting,

Iolanthe x

Tuesday, 1 March 2011

Distressed Happy Birthday


A quick card just to get the mojo moving. The first pansies are blooming in my garden, so it had to be a pansy card. Such cheerful little flowers, they really make me feel like spring is just around the corner.

Today's card is for the Our Creative Corner Challenge, Distress to De-Stress. The paper is Prima Analee inked with lashings of Shabby Shutters Distress ink.

The focal image has been punched with the Martha Stewart Pansy around the page set. I love this punch its just so pretty.

Back soon, happy crafting,

Iolanthe x


Say Hello To Harry


Hi there. Long time no see. Just a quick post to introduce my new best friend, Harry. There, I've written his name down, so we can't change it again LOL.

Harry was originally called Cefa, (as in C for cat), which I thought was quite cute, but he is such a Houdini, that we decided to call him Harry instead. He's a rescue cat and is about 3 years old and I'm totally besotted by him. He has settled in so well that its just like he's always been with us. He's so gentle and affectionate with us even hubby is smitten too.

All my crafting friends know that, whilst I LOVE to make books, I don't 'do' 12x12 scrapbooking. Hmmm I think I might just have found a photo subject that might actually make me do some. Watch this space.......

Poor health has taken my mojo away over the last few weeks but I think its starting to return. If I disappear from blogland, you'll know why, but. hopefully things are about to turn around.

So, in the meantime, give thanks for all the wonderful little blessings of each day. It is so easy to take them for granted.

Back with a crafting post soon.

Iolanthe x

Tuesday, 15 February 2011

Happy Anniversary


Hello my blogging friends. This card is for my Mum and Dad's Wedding Anniversary.

A few health issues have meant I don't have much energy to spend crafting at the moment so, I wanted maximum impact in minimum time. Looking around I found some beautiful glittered rubons which I've had for ages.

The base card is 7 inches square, which just allows a piece of 6x6 paper to be used without any trimming. \the base paper is from a 6x6 stack of Prima Analee. This was then embossed with large swiss dots and the edges inked with Bundled sage distress ink. The edges were enhanced by a peel off border, which just added a little bling.

The focal panel was cut with a Go Create die and again, the edges inked with the Bundled Sage, whilst still in the die to keep the edges white.

A tag stamped with the sentiment, 3 gorgeous rhinestones and some organza ribbon finish to off.

Back soon.

Iolanthe x


Friday, 4 February 2011

Bit Box Cards 2


I have two 'bit boxes'. In one I keep all the die cut label shapes and mats that I've cut, but for one reason or another haven't used. In the other I keep all the bits that I've created when I've been playing.

Some months ago I was playing with memory glass and alcohol inks and created the centrpiece of this card. I stamped the bird in the heart, which if I remember rightly was a free stamp with Craft Stamper early last year, on the glass with Black Stazon. When that was dry I inked the back of the stamp with 2 different alcohol inks. I thought the resulting tile was really cute, so it was popped into the 'bit box' where it remained until today.

The base card is 5x5, smaller than I usually do, but the Marths Stewart corner and border punches fit exactly, if you are very careful! The backing paper is from the gorgeous Analee Prima 6x6 pad, which is lovely for femenine pretty cards. Little birdie was popped onto a Nestie mat from the other bit box with Diamond Glaze.

Thanks for stopping by, until next time.

Iolanthe x

Wednesday, 2 February 2011

Nestabilities 2011 Winter Releases

Those of you who are obsessed with these little beauties might like to know that they can be pre-ordered now from The Stamp Pad now!

I just want to say, I don't work for the Stamp Pad, just wanted to promote my lovely friend Gwen and her amazing shop, I think this is a great offer.

I have set up a page on my blog where you can see order the details. Look here:.

If you want to see all of the new releases look on the Spellbinders site here

Here are some pics of the little beauties......


Aren't they fabulous? That's just a few to whet your appetite! I think I'm going to have to go into therapy, (but not before I've got my order in.)

I'm off to make my list.....

Iolanthe x

Tuesday, 1 February 2011

Simply Sanded


This card was the result of a little experiment. I picked up this cutlee little embossing folder at The Stamp Pad last week and thought I'd have a play. I dug out a pad of Prima papers and thought, "I wonder what it would be like embossed and sanded?" and this was the result. I sanded the edges of the paper to finish it off before mounting on a 6x6 card base.

I had the (badly) stamped Nestie label in my bit box (can't bring myself to throw things like that away!). When I put it next to the sanded card I really liked liked the fact that it wasn't perfectly stamped, it added to the slightly shabby look of the card.

Then I went slightly bling crazy and popped some tiny gems into the middle of each of the little flowers. It's a pity the piccy doesn't do its sparkliness much justice.

Hmmmmm, what next?........

Off to play,

Iolanthe x

Monday, 31 January 2011

Glamorous Jazmyne Part 2


Here we are again with the rest of the Jazmyne 40th Birthday Book.

The left hand page is simply created from  1/4 of a circular scalloped paper, which makes a nice pocket for a large photo mat. The right hand page is finished with rub-ons with the right hand side opening out to give space for extra pictures or journalling.


These pages are very straight forward using chipboard pieces for the embellishment. Again, only the outer edges are fixed down allowing photos to be slipped under the chipboard as required.


On the left hand side the chipboard plaque is secured with organza ribbon which is held in place with a glazed brad at the top and the bottom. On the right hand page I used a large white rub on corner to break up the purple background. The flower is a chipboard piece and the pocket is placed on hinges so that it can be moved downwards to see all of the photo mat behind it.


The little flap down pocket on the left has a magnetic fastening under the Prima flower. On the right hand page I secured a K&Co scalloped tag with a glazed brad so that it can swivel out of the way to place a photo underneath. 

And there you have it. I loved working with these papers. Totally girly and very glamorous. All the papers and accessories used in the book are available here.

I wasn't able to give the book to the recipient in person, but I'm told she absolutely loved it, which is always nice to hear. She has quite a few events planned for her 40th Birthday year and has promised to let me see it when it is filled with all her special photos.

Now, what next? Maybe time for a bit of card making, or box decorating. Too many decisions.

Bye for now.

Iolanthe x

Sunday, 30 January 2011

Gorgeous, Glamorous Jazmyne Part 1


So, Hubby's baby sister turned 40. Time to make a book. She is a really 'girly girl', so I knew she would like the papers. I nearly had to go into therapy to get the point where I could cut it up though. If you have never seen Bo Bunny's Jazmyne Collection it is absolutely scrumptious. Every sheet is glittered and the colours are just fab. I am drooling I know.


All that said, it could be too much on its own, so I decided to team it up with lots of plains and co-ordinating 'double dot' papers, which I think toned it all down just enough, but without taking away any of its gorgeous glamour.


The collection includes co-ordinating ribbons, brads, buttons, rub-ons and a 12x12 sheet of chipboard pieces all of which make putting a book like this together a dream. This pair of pages is very simple. A couple of pockets and tags dressed up with Prima flowers and brads. I have used the same Martha Stewart border punch throughout the book, which I think gives It a feel of unity.


This pair of pages both have flaps decorated with rub-ons - well you can't cover them up can you? The flap on the left opens back, secured with page flips and the one on the right lifts up, secured with a gold swirl. The frame was cut with my Cricut. Where there is a frame I always leave one free edge so that a photo can be slipped underneath (but I leave double sided tape in place so it can be sealed down later).


Last two pages for today. Pockets galore. Three small tags on the left, one huge one in the scalloped pocket on the right. Finished off with on the left with a chipboard swirl and three green candydots. Each of the tags has a matching ribbon and one of the gorgeous Bo Bunny glazed brads. The right hand pocket is finished off with a chipboard flower on the photo mat and two Prima flowers, again joined together with a glazed brad.

All the materials to make the book pages are available from The Stamp Pad.

Until next time, happy crafting,

Iolanthe x


Saturday, 29 January 2011

Birthday Wishes For My Brother


I needed to make a card pretty fast for my Brother's Birthday and I remembered that I had this Marianne die with the 3 little owls that I have never used. Aren't those little fellas so cute! I thought they were just right for a masculine card. I think they'll be let out to fly a little more often in future.

Stripey background paper is Basic Grey Archaic. The card is 6 inches square. So I simply 'cuttlebugged' the tree bark panel, which I think works really well with these little guys. I Popped them on their branch and just added a stamped sentiment onto a Nesties tag with a little brown ribbon.

Four brown Candy Dots just finished it off. Really quick and fun to do. I hope he likes it.

Have fun,

Iolanthe x


Friday, 28 January 2011

Mini Marathon Part 4

Hello friends. I keep going missing don't I? Well, the truth is I am having a few health issues that are preventing me from spending as much time as I would like playing.

Anyway, here are the final pictures of my Graphic 45 book which is for a 40th Birthday. I hope the recipient  likes it. I have to say of all the things I have made recently, this was the most fun, and yet it was a little out of my normal style.


The lady in the picture just looked so elegant, she was far too lovely to cover up,..........


So under the flap there is a nice space for two photos or some journalling.


I cut around the frame so that it opened like a little door. This was really cute. On the opposite page there was another lovely lady that had to remain on view with a little pocket in which to put a memento or a secret perhaps!


This pocket opens out to reveal 2 large photo spots and is fastened with a magnet hidden under the flower. But, I couldn't stop there! I found a tiny piece of paper with yet another elegant lady and decided to cut her out and stick her to the back of a Tim Holtz oval and dangle her with some fibre from the flower. I just love the way it added some movement and texture.


 Another flap with hidden photo spots and finally a large pocket that has another little mini book in it for even more piccies.


So, there you have it. Thank you for taking the time to look. If you come back soon I have another album that I've just finished for my sister-in-law's 4oth using the gorgeous Bo Bunny Jazmyne collection.

Back soon.

Iolanthe x